

CSPR.trade is a decentralized exchange that allows users to swap various tokens on the Casper Network. It uses a battle‑tested, Uniswap V2 protocol–based automated market maker (AMM) model, which means that instead of a traditional order book, trades are executed against liquidity pools. These pools are powered by a constant product formula that automatically determines prices based on the ratio of tokens in each pool.
Users can trade tokens directly through the platform, and they can also become liquidity providers (LPs) by depositing their tokens into these pools to earn trading fees. Every trade on the platform incurs a small fee that is distributed to liquidity providers, creating a passive income opportunity for those who contribute to the platform's liquidity.
CSPR.trade is a decentralized exchange that allows users to swap various tokens on the Casper Network. It uses a battle‑tested, Uniswap V2 protocol–based automated market maker (AMM) model, which means that instead of a traditional order book, trades are executed against liquidity pools. These pools are powered by a constant product formula that automatically determines prices based on the ratio of tokens in each pool.
In traditional exchanges, buyers and sellers place orders in an order book, and trades occur when orders match. Automated market makers take a different approach. They use liquidity pools containing pairs of tokens, and prices are determined algorithmically based on the ratio of tokens in the pool.
The constant product formula (x × y = k) ensures that the product of the quantities of the two tokens remains constant. When you trade one token for another, you add to one side of the pool and remove from the other, which automatically adjusts the price. Larger trades relative to the pool size result in greater price impact, a phenomenon known as slippage.
To begin testing CSPR.trade, you will need Casper Wallet and some Testnet CSPR tokens. If you do not have it already, you can download Casper Wallet and set it up following its user guide.
Once your wallet is ready, you can obtain free Testnet CSPR from the Casper Testnet Faucet. Simply sign in using your Casper Wallet, and request the tokens. They should appear in your wallet shortly.
*Make sure Testnet is the currently selected network on your wallet before continuing.
Follow these steps to test the core features of the CSPR.trade platform.
1. Navigate to the CSPR.trade platform.
2. Click the "Sign in" button on top right.
3. Select Casper Wallet and follow the prompts to connect your account.
4. Once connected, you should see your account address (public key) on top right of the page.
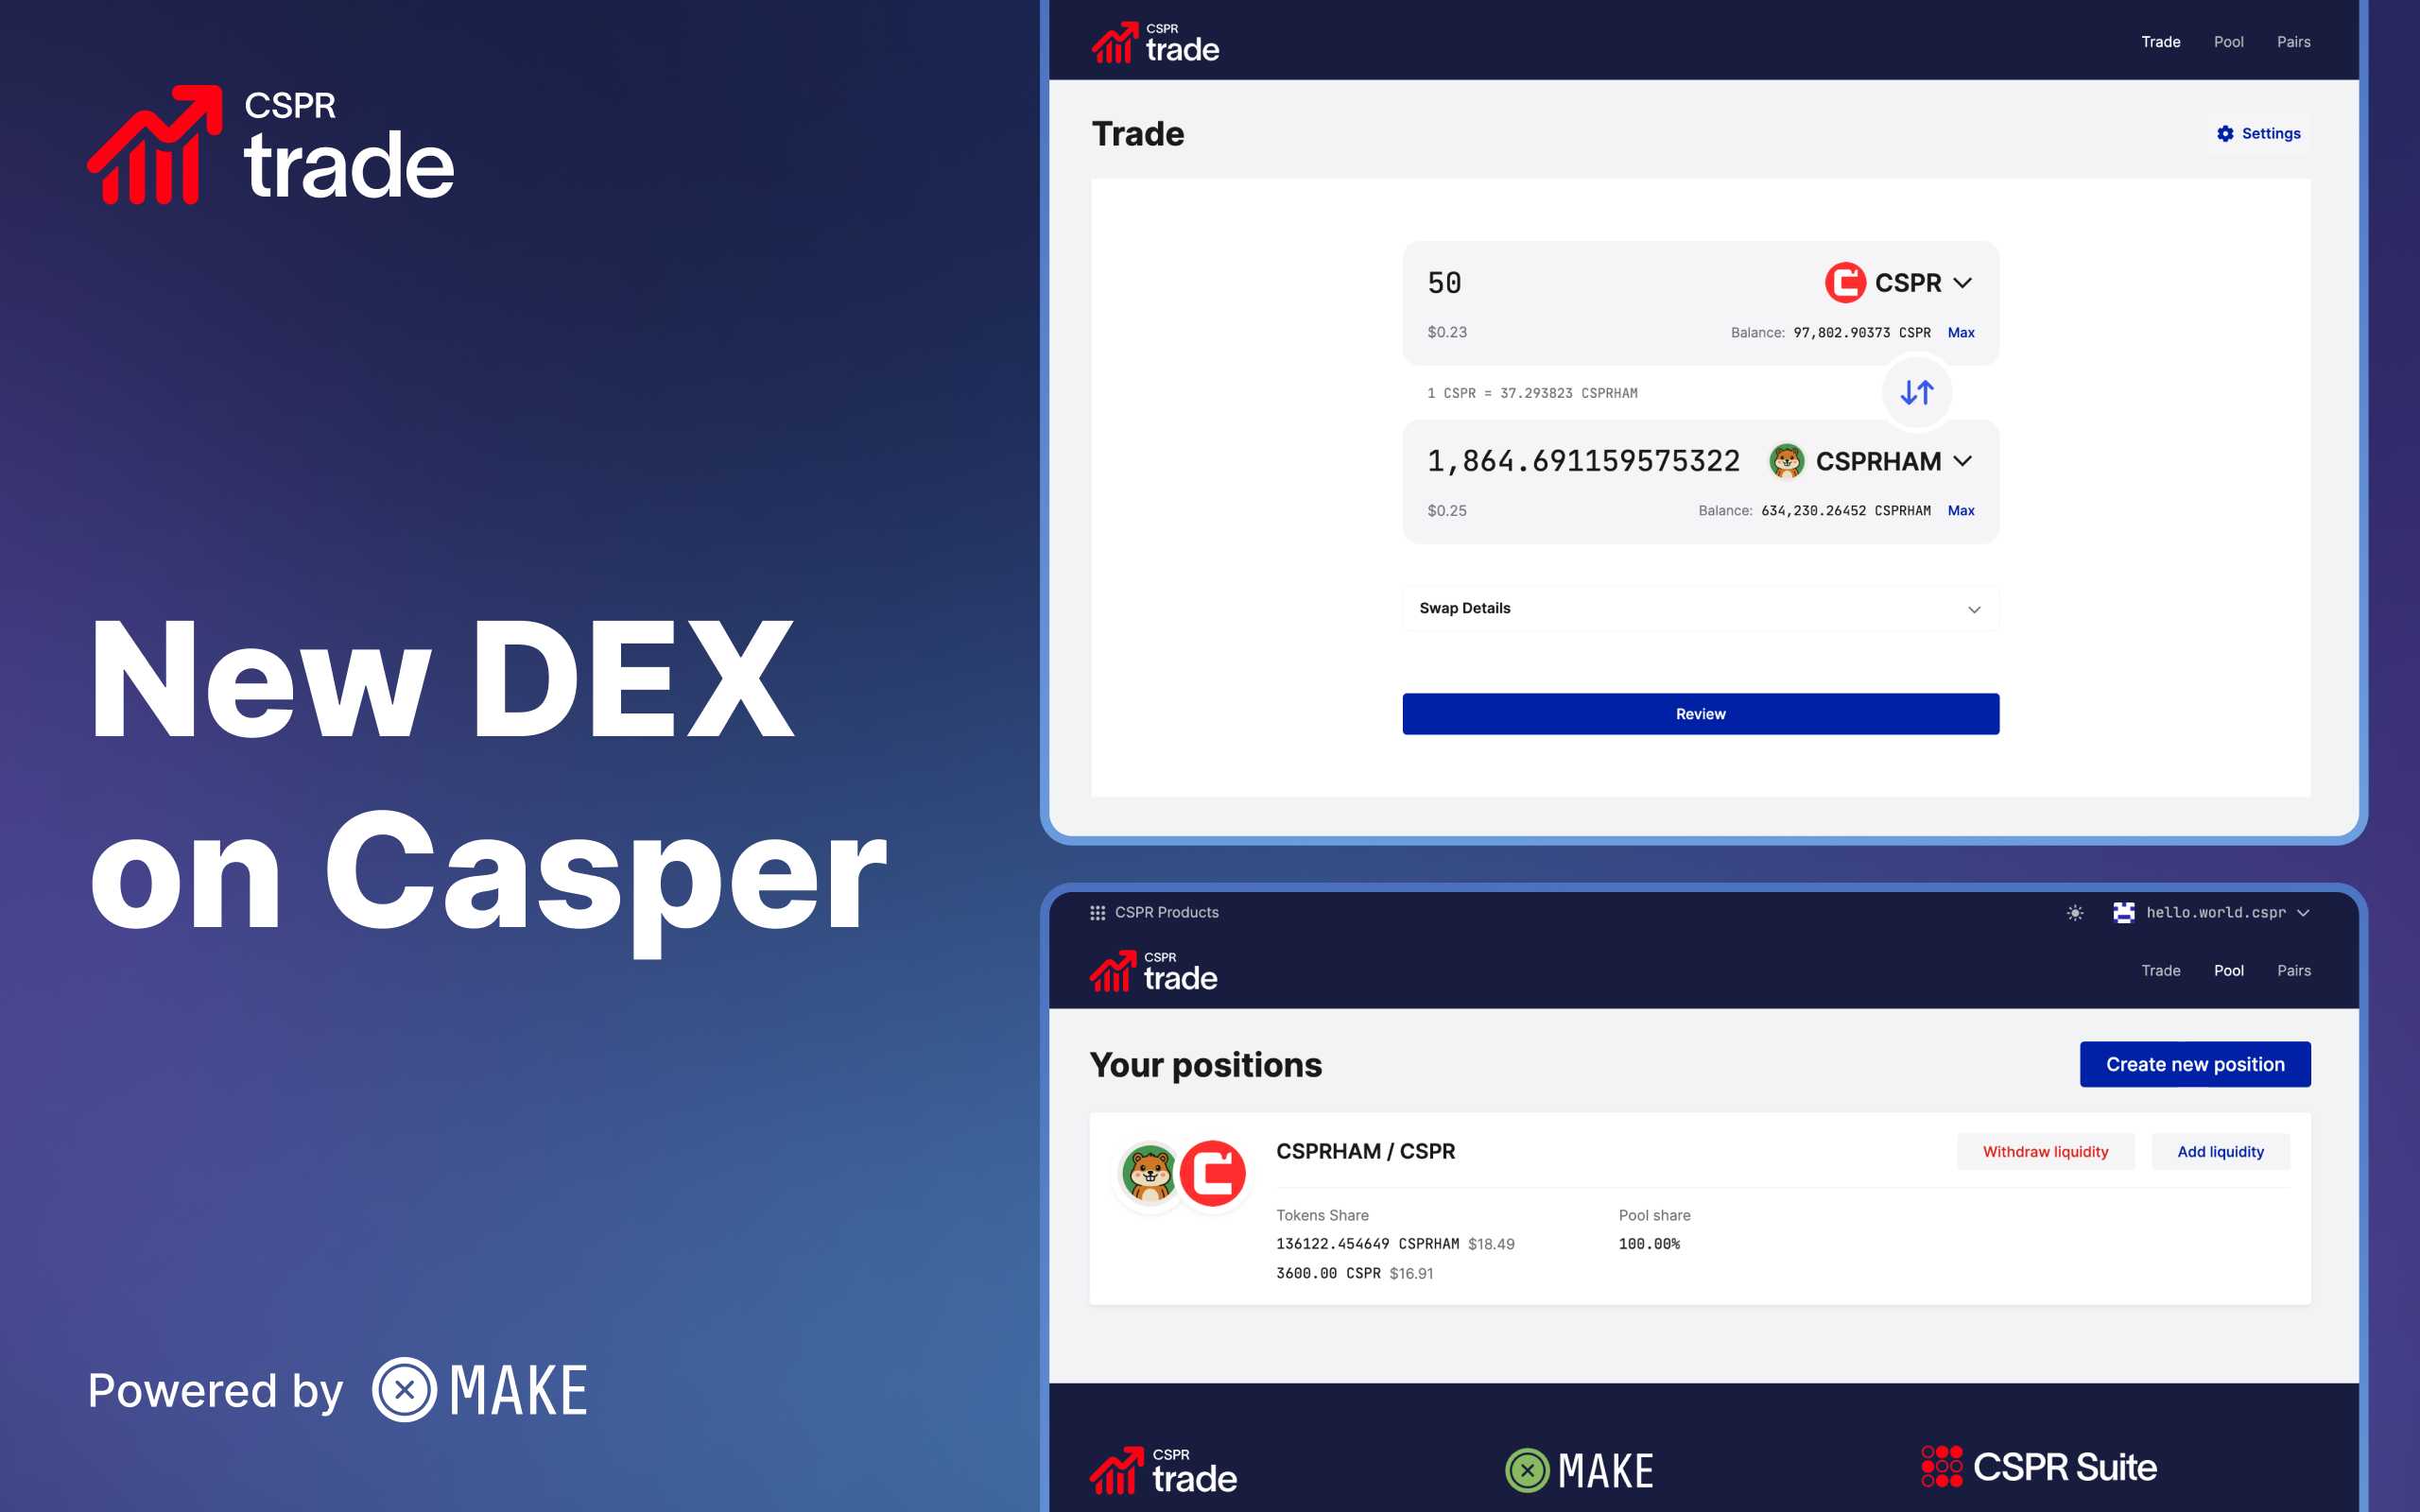
1. Once your wallet is connected, you will see the "Trade" interface with two token selection fields.
2. In the top field, select the token you want to trade from (e.g., CSPR).
3. Enter the amount you wish to swap, or click "Max" to use your entire balance. (Beware that you may not be able to carry out any other operations if you swap all of your CSPR tokens since you will need them to pay for transaction fees.)
4. In the bottom field, select the token you want to receive (e.g., CSPRHAM, CSPRDOG, WUSDC, WETH).
5. The interface will automatically calculate and display the estimated amount you will receive based on current pool ratios.
6. Expand and review the "Swap Details" section, and pay extra attention to price impact or slippage warnings.
7. Click the "Review" button, and review the summary information on the pop-up window.
8. Click the "Confirm" button and "Sign" the transaction in your wallet, after checking out the transaction details.
9. Wait for the transaction to be confirmed on the blockchain.
10. After confirmation, check your wallet to verify that you have received the new tokens and that your balance has been updated correctly.
11. Click the "Settings" button at top right of the "Trade" tab, try out different values, and carry out different swap operations as you wish. Make sure you have some CSPR tokens left to carry out liquidity operations.
*Please note that you may need to sign an additional transaction at the confirmation step to approve token spending if the source token you are swapping is different than CSPR.
1. Navigate to the "Pool" section of the platform.
2. Click the "Create liquidity position" button.
3. Select the two tokens for which you want to provide liquidity (e.g., CSPR and CSPRHAM).
4. Enter the amount for one of the tokens. The interface will automatically calculate the required amount of the second token to maintain the proper ratio based on the current pool composition.
5. Click the "Review" button, and review the summary information on the pop-up window.
6. Click the "Confirm" button and "Sign" the transaction in your wallet, after checking out the transaction details.
7. Wait for the transaction to be confirmed on the blockchain, and click the "Go to my positions" button.
8. Review your positions, and pay attention to "Tokens Share" and "Pool share" values.
9. After the transaction is confirmed, you will receive LP (Liquidity Provider) tokens in your wallet. These tokens represent your proportional share of the liquidity pool and can be redeemed at any time for your share of the underlying tokens plus any accumulated fees. The tokens are named in the form "CSPR.trade: FIRSTTOKEN - SECONDTOKEN", like "CSPR.trade: CSPR.ham - Wrapped CSPR" for the CSPRHAM-CSPR pair.
*Please note that you may need to sign an additional transaction at the confirmation step to approve token spending if this is your first time providing liquidity for these tokens.
1. Return to the "Pool" section of the platform if you are not already there.
2. You should see a list of your existing liquidity positions showing which pools you have contributed to and your share of each pool.
3. Click the "Withdraw liquidity" button next to the position you wish to remove or reduce.
4. Choose the percentage of your liquidity you want to withdraw (e.g., 25%, 50%, 75%, or 100%), or manually enter a percentage value, then click the "Withdraw" button.
5. The "Withdraw liquidity" dialog will show you how many tokens of each type you will receive back, along with the expected details of your position after this operation.
6. Click the "Confirm" button and sign the transaction in your wallet, after checking out the transaction details.
7. Wait for the transaction to be confirmed on the blockchain, then click the "Go to my positions" button, and observe the updated details of your position(s).
8. Your LP tokens will be burned, and you will receive the corresponding amounts of both tokens back in your wallet, including your share of any trading fees that have accumulated.
We encourage you to thoroughly test the platform and explore different scenarios. Here are specific areas to focus on:
Token Swapping: Try swapping different token pairs with various amounts. Start with small amounts and gradually increase to observe how slippage and price impact change. Pay attention to the exchange rates displayed before confirming transactions and verify that the amounts you receive match expectations.
Liquidity Provision: Add liquidity to different pools with varying amounts. Observe how the interface calculates the required ratio of tokens and how your LP tokens are issued. Try providing liquidity to pools that already have significant reserves versus pools that may be newer or smaller. To provide the opportunity to test cases similar to real world, there will be multiple pools with different liquidity levels (e.g., low, medium, high).
Liquidity Removal: After providing liquidity, try removing different percentages of your position. Verify that you receive the correct amounts of both tokens and that your LP token balance decreases appropriately.
Arbitrage Opportunities: Pay attention to token price fluctuations on the DEX, and difference between the price/value of the liquid staking token (sCSPR) on the DEX and on the Liquid Staking platform on Testnet, and take the opportunity to make some Testnet profit!
User Interface: Evaluate whether the interface is intuitive and easy to navigate. Are the instructions clear? Are there any visual glitches, misaligned elements, or confusing labels? Does the platform work well on different screen sizes?
Transaction Speed and Performance: Monitor how long transactions take to confirm. Is the platform responsive when you interact with it? Are there any delays or loading issues?
Error Handling: Intentionally try to perform invalid actions to test the platform's error handling. For example, try to swap more tokens than you have, attempt to provide liquidity with an insufficient balance, or enter zero or negative amounts. Note what error messages appear and whether they are helpful and clear.
If you encounter problems during testing, here are some common solutions:
Wallet Connection Issues: Ensure your wallet is properly installed and configured for the Casper Testnet. Try refreshing the page and reconnecting your wallet.
Insufficient Balance: Verify that you have enough Testnet CSPR in your wallet. You can request them from the Casper Testnet Faucet (once per account). Remember that you need CSPR not only for the tokens you're trading but also to pay transaction fees.
Your feedback is invaluable for improving the platform before the Mainnet launch. As you test CSPR.trade, please document:
Issues Encountered: Describe any bugs, errors, or unexpected behavior. Include the steps to reproduce the issue so the development team can investigate.
Transaction Details: For any problematic transactions, record the transaction hash and your public key.
User Experience: Share your thoughts on the interface design, ease of use, and overall experience.
Suggestions: Provide any ideas for improvements or additional features you'd like to see.
Then submit your feedback by using the CSPR.trade Open Beta Feedback Form.
If you need help or have questions at any point during the Open Beta, please head over to the official Casper Telegram Group or to the official Casper Discord Server. Please don't forget that our official support staff never approaches you through DM; so always stay in the official public groups.
For more information about the Casper Network and related tools, please visit:
Thank you for participating in the CSPR.trade Open Beta! Your testing and feedback will help us build a robust, reliable, and user-friendly DEX for the Casper ecosystem.
